[라즈베리파이]
1일차
IoT란?
Internt of Things
사물 인터넷


- 센싱 기술
- 네트워크인프라 기술
- IoT서비스 인터페이스 기술
데이터 3가지 종류
- 정형데이터
- 엑셀화 처럼 되어있고, 연산도 가능한 데이터
- 인덱스로 접근이 가능한 데이터
- 비정형데이터

- 반정형데이터
- 키값으로 접근가능 json

라즈베리파이를 배우는 이유는 데이터 수집을 하기 하기위해
AIoT : 인공지능 + IoT 결합된 용어
사물인터넷 문제점 및 해결 방안

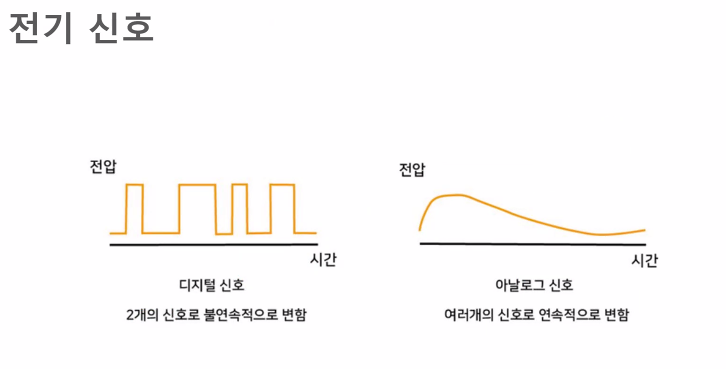
디지털 신호 : 1 과 0 전달하는 신호, 전등스위치
아날로그 : 여러개의 신호로 연속적으로 변함, 밝기조절하는 스위치
전기신호 :
- 센서 : 감각하여 알아내는 장치
- 바깥의 신호를 읽어낸다.
- 액추에이터 : 명령을 내려서 움직이는 장치
- 출력값에 의해 작동하는 장치

센서작동 과정

액츄에이터 과정


아두이노(Arduino)
Arduino C++언어기반 개발
센서로 수집
라즈베리파이(RaspberryPi)
라즈베리 + 파이썬
Linux OS플랫폼 중심, 파이썬 언어 개발
라즈베리파이
장점 : 통신적 효율
단점 : 아두이노에 비한 단점

라즈베리 OS 환경 구축해주기
SD 카드 포매터와 DISK IMAGER 를사용한다

1. sd 카드를 비어있어도 혹시 모르니 포맷한다.

2. YES 클릭

3. 포맷되었다고 안내가 뜬다

4. 디스크 imager 파일 선택 후 write 클릭 후 tex

5. 완료


GPIO
<gpio 사진 두장>
신호 변환기
GPIOHeader
<핀 확대 및 설명 사진>
물리적 기능 숫자부여
DC POWER 핀 역할 : 전력공급
GROUND 접지 : 0으로 만들어버림 ' - (마이너스) 역할'
LED 전구
긴쪽 + 짧은쪽 -
점퍼선 : 연결시켜주는 선
튀어나온거 수 안튀어나온 거 암
- 수수점퍼선, 수암점퍼선, 암암점퍼선
Breadboard (빵판 )
<전구연결 사진>
라즈베리 클릭 -> 개발 ->thonny python pi
새폴더 생성
새페이지에
GPIO 라이브러리 설치
import RPi.GPIO as gpio
셋팅 명령어
gpio.setmode(gpio.BCM) :
import RPi.GPIO as gpio
import time

# 값 읽어오는 이름 뭘로 가져올건
gpio.setmode(gpio.BCM) # gpio번호 name으로 읽어오겠다!
                    # pin#번호로 읽고싶다면 gpio.BOARD

#
gpio.setup(18,gpio.OUT) # 18번 핀을 액츄에이터에 연결해서 사용

# cnt = 0
try:
    while True:
        gpio.output(18,gpio.HIGH)
        time.sleep(0.2)
        gpio.output(18,gpio.LOW)
        time.sleep(0.2)
        #cnt += 1
        #if cnt > 20 :
            #break
except KeyboardInterrupt:
    gpio.cleanup()
빅데이터
2일차
ADC
<아날로그 변환기 사진>
AGND 아날로그 - 극
DGND 디지털 - 극
조건문을 이용하여 밝기가 밝을때와 어두울때 led 전구를 켜보자
조도센서를 통해 읽어드린 데이터를 db에 저장하기
센서정보를 저장할 데이터베이스 생성(MariaDB)
- cmd 창에 입력
마리아 디비 서버 설치
pi@raspberrypi:~ $ sudo apt-get install mariadb-serverroot 관리자로 강제 접속
pi@raspberrypi:~ $ sudo mysql -u rootroot 계정 비번 설정
MariaDB [(none)]> alter user 'root'@'localhost' identified by '1234';root계정 비밀번호입력하여 접속
pi@raspberrypi:~ $ mysql -u root -p데이터베이스 생성
MariaDB [(none)]> create database test;테이블생성
MariaDB [test]> create table sensordb(sensing int, ts timestamp default current_timestamp);테이블 정보 확인
MariaDB [test]> desc sensordb;테이블에 데이터 추가
MariaDB [test]> insert into sensordb(sensing) values(700);테이블에 들어간 데이터 확인
MariaDB [test]> select * from sensordb;
데이터베이스와 파이썬과 연결 모듈 설치
pi@raspberrypi:~ $ sudo pip3 install PyMySQL
import pymysql as ps
import spidevRead as sr
import time

conn = ps.connect(host = 'localhost', user = 'root', passwd = '1234', db = 'test')

curs = conn.cursor()# 모든 함수들이 cursor 안에 있다
while True:

    sql = f"insert into sensordb(sensing) values({sr.analog_read(0)})"
    curs.execute(sql)
    conn.commit()

    time.sleep(1)
import pymysql as ps
conn = ps.connect(host = 'localhost', user = 'root', passwd = '1234', db = 'test')
curs = conn.cursor()# 모든 함수들이 cursor 안에 있다
sql = "select * from sensordb"
curs.execute(sql)
result = curs.fetchall()
# print(result)
for i, j in result :
print(f"sensing : {i} / ts : {j}")
문자열 함수중 하나 (join)
#join
s = "승환쌤"
result = "*".join(s)
print(result)
3일차
.bashrc로 들어가기
pi@raspberrypi:~ $ nano ~/.bashrc
파이썬3으로 하겠다
alias python='usr/bin/python3'적용하기
pi@raspberrypi:~ $ source ~/.bashrc--> 아무런 동작이 일어나지 않는다
파이썬파일을 저기다가 저장하겠다
pi@raspberrypi:~ $ curl -O https://bootstrap.pypa.io/get-pip.py -o get-pip.py파이썬 3로 실행
pi@raspberrypi:~ $ python3 get-pip.py --useraws 명령어 사용할수있게 설치
pi@raspberrypi:~ $ pip3 install awscli --upgrade --user프로파일 파일 편집기 열기
nano ~/.profile--> 로그인하는데 환경설정
맨 밑에 입력
export PATH=~/.local/bin:$PATH적용하기
pi@raspberrypi:~ $ source ~/.profileaws 버전 확인하기
pi@raspberrypi:~ $ aws --version설정
pi@raspberrypi:~ $ aws configure입력하기
AWS Access Key ID [None]: aws액세스키 입력
AWS Secret Access Key [None]: aws액세스키 비밀번호 입력
Default region name [None]: us-east-2
Default output format [None]: json
파이썬 모듈 boto3 설치하기
cmd 창 열어서
pi@raspberrypi:~ $ sudo pip3 install boto3파이썬에서 코드로 이미지를 분석하기
4일차
Comparing faces in images - Amazon Rekognition
CompareFaces uses machine learning algorithms, which are probabilistic. A false negative is an incorrect prediction that a face in the target image has a low similarity confidence score when compared to the face in the source image. To reduce the probabili
docs.aws.amazon.com
얼굴사진 비교하기

코드 복사하기
# Copyright 2018 Amazon.com, Inc. or its affiliates. All Rights Reserved.
# PDX-License-Identifier: MIT-0 (For details, see https://github.com/awsdocs/amazon-rekognition-developer-guide/blob/master/LICENSE-SAMPLECODE.)

import boto3

def compare_faces(sourceFile, targetFile):

#     session = boto3.Session(profile_name='profile-name')
    client = boto3.client('rekognition')

    imageSource = open(sourceFile, 'rb')
    imageTarget = open(targetFile, 'rb')

    response = client.compare_faces(SimilarityThreshold=0,
                                    SourceImage={'Bytes': imageSource.read()},
                                    TargetImage={'Bytes': imageTarget.read()})
#     print(response)
    for faceMatch in response['FaceMatches']:


        print("본인일 확률은 {:.2f}%입니다.".format(faceMatch['Similarity']))

    imageSource.close()
    imageTarget.close()
    return len(response['FaceMatches'])

def main():
    source_file = '../Downloads/me1.jpg'
    target_file = '../Downloads/song.jpg'
    face_matches = compare_faces(source_file, target_file)
    print("Face matches: " + str(face_matches))

if __name__ == "__main__":
    main()